Asana project management – All you need to know to manage projects and track time with Asana
20 min read
In this post, you’ll learn how to use Asana for project management. It is an in-depth guide with many tips and insights. You will learn everything from setting up your project to creating templates, recurring tasks and using the reporting features to manage your projects efficiently.
So grab a cup of coffee and log into your Asana account. (Create your free Asana account if you don’t have one).
But first, let’s get some basic questions about Asana out of the way.
Is Asana a project management tool?
Asana is a project management tool that is popular with startups, agencies and many other businesses. It’s one of the easiest yet powerful project management software.
Asana’s popularity stems from its ease of use as well as powerful features you can use for managing projects.
Is Asana project management tool free?
Asana is free for up to 15 users. The free version is good enough to meet the project management needs of most small businesses and startups.
You can upgrade to the premium version for $10.99 per user per month (when paid annually) if you have a larger team or need premium features for your projects.
The Business version, with even more features, costs $24.99 per user per month, when paid annually.
Who uses Asana?
Individuals and teams of any size use Asana to manage projects, track tasks, and keep track of project communication.
Software startups were the earliest users of Asana. These companies needed a simple and affordable project management tool to manage software development. Asana fit the bill perfectly. The popular project management tools of the time such as Microsoft Project were too complex and expensive for software startups to use.
Today, people use Asana to manage all sorts of projects; from managing marketing campaigns to product launches. During Covid, many businesses started using Asana for managing remote employees.
What is Asana tool used for?
you can use Asana to manage any type of work, but it’s mostly used for managing projects. Asana helps you stay on top of your projects. You can manage tasks, team members, project communication and project milestones with Asana.
Whether you manage software development, marketing, or finance, Asana can help you manage your team’s work.
How to track time in Asana?
Asana has a native time tracking feature in the Business and Enterprise versions. If you are using the Premium or free version, you can use HiveDesk time tracking software to record the time spent on a task.
Just sign up for your 14-day free trial and connect your HiveDesk account to Asana. HiveDesk will track time spent on each task and display it against your tasks inside the Asana account.
HiveDesk + Asana Work better together. Track time inside Asana workspace with HiveDesk.
Table of Content
The anatomy of Asana project management tool
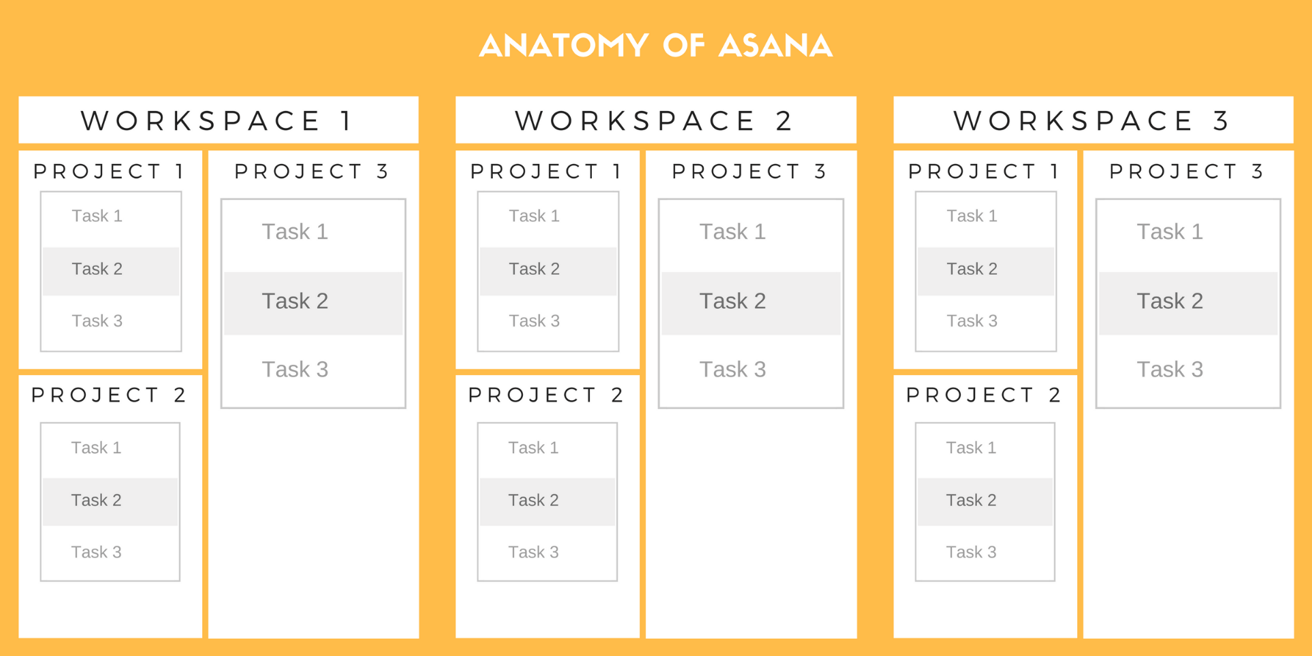
The first thing you need to learn is how Asana works. When you sign up for Asana, you create your own individual account. The account gives you access to Organizations and Workspaces. Workspaces include projects, that in turn include tasks.
Organization
An organization in Asana is a group of people who work at the same company. When you join Asana using the email domain of your company, it will assign you to your company organization. For example, if your company’s email domain is @yourcompany.com, anyone who joins Asana using this email domain will become part of the company organization.
An Organization member can
- Create a new team
- Request to join other teams in the organization
- See other members’ name and email address
- Access projects and tasks that are public to the Organization
You can also invite others who are not using the company’s email domain to be part of your Organization. Asana calls them Organization Guests. They can access projects and tasks and collaborate in managing projects with others in the Organization.
Workspace
A workspace is a shared work area for a group of users. Users sharing a workspace can collaborate on projects and tasks in the workspace. You can create multiple workspaces and invite others within your organization or from outside to join the workspace.
A Workspace is a dedicated work area for your team. The team could be as big as your entire company or as small as just you. Within the Workspace, you create your project. A project is a collection of tasks that you need to do in order to achieve a goal.
If you’re going to use Asana for managing projects or work related to different clients or teams, you should create separate Workspaces for each of them.
Creating your first project in Asana
Now that you know how Asana is structured, you can go ahead and create your project.
The first step in creating a project is to create a Workspace:
- Click your Profile Icon in the top right hand corner
- Select More in the list
- Click Create New Workspace
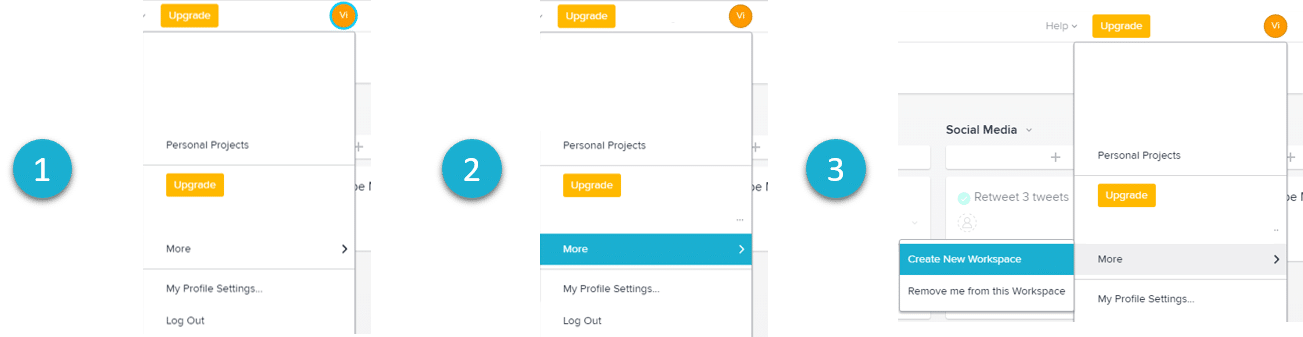
Asana will display the Create Workspace dialog box.
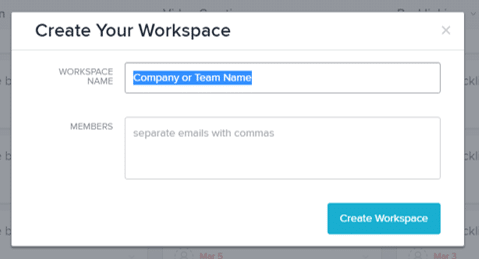
Give the workspace a descriptive name. Use a name based on the projects you want to create in the organization. For example, create separate workspaces for your software development and marketing teams, as they will need access to different projects. Add email addresses of your team members who will need access to projects in the workspace.
Once the Workspace is ready, you can create projects in it.
Creating a project in Asana
Projects are the containers for tasks you need to do to achieve a goal. Software product release or a new marketing campaign are examples of projects.
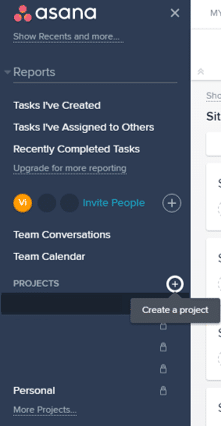
You create a new project by clicking the Create New Project button in the left navigation panel.
You give your project a descriptive name that clearly identifies the project’s goals. This makes it easy to identify projects once you have a few of them. You can create two types of projects in Asana:
- List style project – A list style project displays tasks in the form of a to-do list. You should use this style if the project has many tasks, making it hard to display them in board style on a single screen.
- Board style project – A board style project displays tasks like sticky notes on a board. In this style, you organize tasks in columns. Each column should contain related tasks for easy organization.
The board style project is visually appealing and allows you to see all tasks at once. The columns also make it easy to organize tasks into groups for easy tracking. The visual structure makes project management easier, but it works well only for simple, smaller projects.
You can keep a project private or make it public to everyone who is part of the Workspace. If you need to control access to projects to certain team members, you will need to get the paid plan. This is useful when you have multiple teams working on the different projects. For example, a software startup may have a team of remote developers working on UI/UX while another team may be working on integrating the software with other apps. You would not want the remote developers working on UI/UX to get access to integration project. In this case, the paid plan will make perfect sense.
You have the option to create the project using a template or create an empty project stub. A template includes common tasks the project should have and makes it easy for you to get started. For example, you may want to use a software development template for managing software development projects. This template will have predefined tasks for software design, development, testing, and deployment. It will provide a ready-made structure for managing the project. Similarly, a template for managing SEO campaigns will have tasks for keyword research, site audit, on-page SEO, link building, etc.
If you are using the free plan, you will have access to basic templates. If you want a template for more complex projects such as managing an editorial calendar for content marketing or launching a software product, you will need to upgrade to the paid plan.
If you don’t want to upgrade and pay Asana every month just for using a template, you can go to Templana. It’s an excellent Asana Template marketplace where you can buy a template you need.
Templana is a popular marketplace for Asana templates. Many independent designers create and sell templates through this site. You can find a template for just about anything for a low, onetime fee. This is a great alternative to upgrading your Asana plan, especially if you are a startup or small business. For example, a software startup can buy this Startup Management template for just $9, less than the cost of Asana subscription for one user for one month. This template has three built-in projects with 75 tasks.
You can also convert one of your existing projects into a template or create a new one from scratch. For example, a digital marketing agency can convert an existing SEO campaign project into a template it can use for all future SEO campaigns. But you need an Asana Premium subscription to create your own custom templates.
If you use Asana to manage repetitive projects, you can copy an existing project to create a new one to save time. When you copy a project into a new one, Asana will create new tasks in the new project that are a copy of tasks in the old project.
Adding tasks to Asana projects
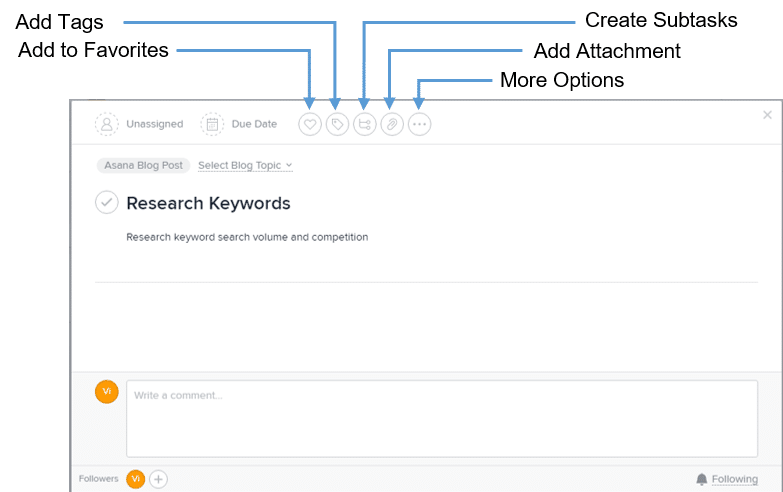
After you have set up your project, it’s time to add tasks to it. A task is the most granular element in Asana. A task has a title, description, and due date. You can assign a task to a team member so you can track performance. Tasks are great for measuring productivity of remote employees and those working from home.
To create a new task, click the blue New Task button on the project page.
Give your tasks a clear name or title that identifies what is to be done in this task. You can add more information about the task in description section. You can assign the same task to multiple projects if required.
You can assign tasks to a user or leave them unassigned. If you’re using Asana to manage your personal projects, you can leave tasks unassigned. But if you’re using Asana for managing projects with multiple people, always assign the task to a specific team member. When you click the name of the person, Asana will display all tasks assigned to that person. Assigning tasks to individuals allows you to track the performance of each team member.
You can further categorize your tasks by creating tags and assigning them to tasks in your projects. For example, if you are managing a software development project, you can use tags such as testing, development, or release to categorize tasks into these buckets.
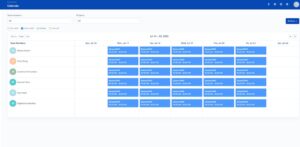
Always assign a due date to tasks so they show up in the calendar view. The calendar view is a great way to understand what your team members are working on each day of the week or month. You can see when specific tasks or deliverables are due and take action if you think a task will not be complete by the due date.
In the calendar view, you can also see tasks that are past their due date, as these are marked in red. Visual aids like calendar view are a great help in project management as you can see the slippages and take corrective action with the concerned team member.
Did you know you can track your tasks in HiveDesk and generate automatic timesheets?
Creating recurring tasks in Asana
Besides creating regular tasks, you can also create Recurring Tasks in Asana. A Recurring Task is one that repeats at a fixed time interval. This could be a task you do every day, week or month. For example, you may send a weekly report to all stakeholders about the project status. You can create a Recurring Task for it and set it to repeat every week. This saves you the hassle of creating the same task every week. Every project has many tasks that recur weekly or monthly. You can save a lot of time by creating Recurring Tasks in Asana..
To create a recurring Task, first add a new regular task to your project. Then click Due Date in the Task Detail view. You will see a dialog box with calendar like this:

Click Set to repeat just above the Done button. Asana will automatically set it to repeat every 7 days.
If you want a different recurrence frequency, click Repeat 7 days after completion. Asana will now allow you to select a REPEAT frequency from a list – Never, Daily, Periodically, Weekly, Monthly, Yearly.
If you select frequency as Weekly, you can also select days of the week when it should repeat. The ability to create a recurring task is a big help if you use Asana for managing ongoing projects.
For example, a digital agency working on a client project will have many recurring tasks like scheduling social media posts and building backlinks. Instead of creating these tasks manually every day, you just create a Recurring Task that repeats every day of the week. As soon as the current instance is marked complete, Asana will create a new instance for the next day. This partially automates project management activities.
Creating subtasks and task templates
You can also create task templates for complex, multi-step tasks in your projects. If your task requires multiple steps, you can create subtasks within a task. You can then assign the subtasks to different people. If you are Asana Premium user, you can also create dependencies between subtasks.
The ability to create subtasks comes in handy when your project has a task that requires different people to work on different activities. For example, for creating a new web page, the content writer will create the content, the designer will create a mock-up of the page and finally the developer will code it.
You can create one task called Publish Web Page and create subtasks for the writer, designer and developer within the main task. When the content writer finishes the content, he can mark his subtask complete. That will be the trigger for designer to start designing the page. When the designer completes her subtask, the developer will start coding. After the page is ready and published, the task will be marked as complete. The ability to create subtasks makes project management easier as you can track both subtasks and the overall task separately.
Since this page creation task is likely to be repeated many times during a web development project, you can create a standard task structure and copy it over for new pages when needed. This will save you a lot of time in creating tasks.
Adding followers to tasks in Asana
You can add followers to a task. Asana notifies followers of a task about the change in status or updates to the task through emails and Inbox alerts. When used with comments, it becomes a powerful communication and management tool for your projects. You can add a Follower by clicking the (+) button in front of followers at the bottom of the task pane beneath the comment box.
Adding comments to tasks
A valuable feature in Asana is the ability to add comments to a task. It’s very handy for providing feedback and tracking progress. Comments are also a great way to communicate with team members and alert them to take action.
For example, a content writer can post a comment to inform the reviewer that the content is ready for review. This comment will send Asana messages and emails to all followers of the task. If the reviewer is also a follower of the task, he will see the email in his Inbox and will know he needs to review the content.
If the reviewer does not provide feedback in time, the project manager can see the comments history and will immediately know that the task is waiting for review. When used well, followers and comments together provide a power tool for effective project management in Asana.
Adding sections to projects in Asana
If you are managing a large project with multiple stages or a complex workflow, you can use sections to organize tasks in your project.
For example, if you are managing an AdWords campaign in Asana, you can create sections for keyword research, creating landing pages, setting up campaign tracking and setting up campaign. You can then add tasks to these sections to build out your AdWords campaign project.
To create a section, hover over the Add Task button. A new button Add Section will appear next to Add Task button. Click the Add Section button to create a new Section.
If you have already added a task to your project and want to convert the task into a section, just add a colon (:) after the task name. The name of the task will now appear in Bold with a line under it, meaning it is now a Section.
Tracking project progress in Asana
As a project owner, you are not only responsible for setting up the project but also ensuring its timely and successful completion. Tracking and monitoring your project is a major part of your project management responsibilities.
Once your team starts working on the project, you can monitor the progress in Asana to ensure timely completion. Continuous monitoring also helps you identify potential problems early in the project so you can stop them from becoming major roadblocks.
You access project information by clicking project name in the left-hand navigation.
Tracking tasks in Asana
Asana displays tasks in a project either as a list or as sticky notes on a board. You can also see the project tasks in Calendar View by clicking Calendar below the project title.
The task list is your starting point for tracking your projects. You can see a list of tasks, who is supposed to do each task and the due date for each task. If the due date for a task is in red, it means the task is past its due date. This is a clear signal that the project may be slip and you need to take action.
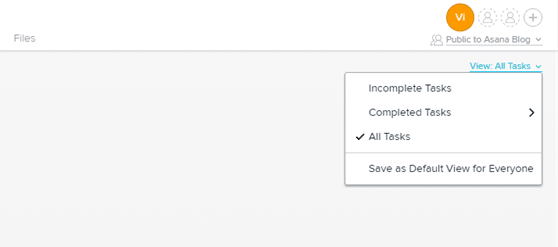
By default, Asana displays all tasks in the project. If your project has many tasks, limit the tasks displayed by applying a filter. Click View drop down to display the filter options. You can view only Incomplete Tasks or Completed Tasks.
You access task details by clicking the task in the list. On the task detail view, you can update task information. You can mark it complete by clicking the Checkmark button.
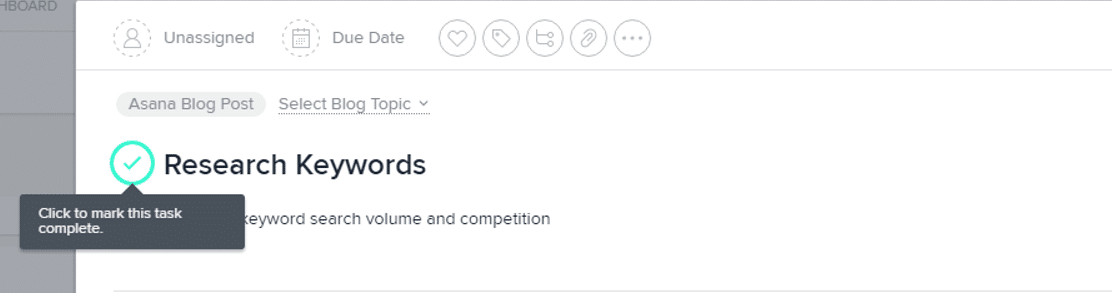
The progress tab displays project progress. You can see how many tasks are there in the project and how many have been completed.
Asana gantt chart
Gantt chart is one of the most popular project management tools. It shows the project schedule in the form of a bar chart.
The Gantt chart lists project tasks vertically and shows the timeline on the horizontal axis. It shows start and end dates for each task and task dependencies. It can also show the current status of the project alongside the original schedule. Gantt Chart makes it easy to visualize project progress.
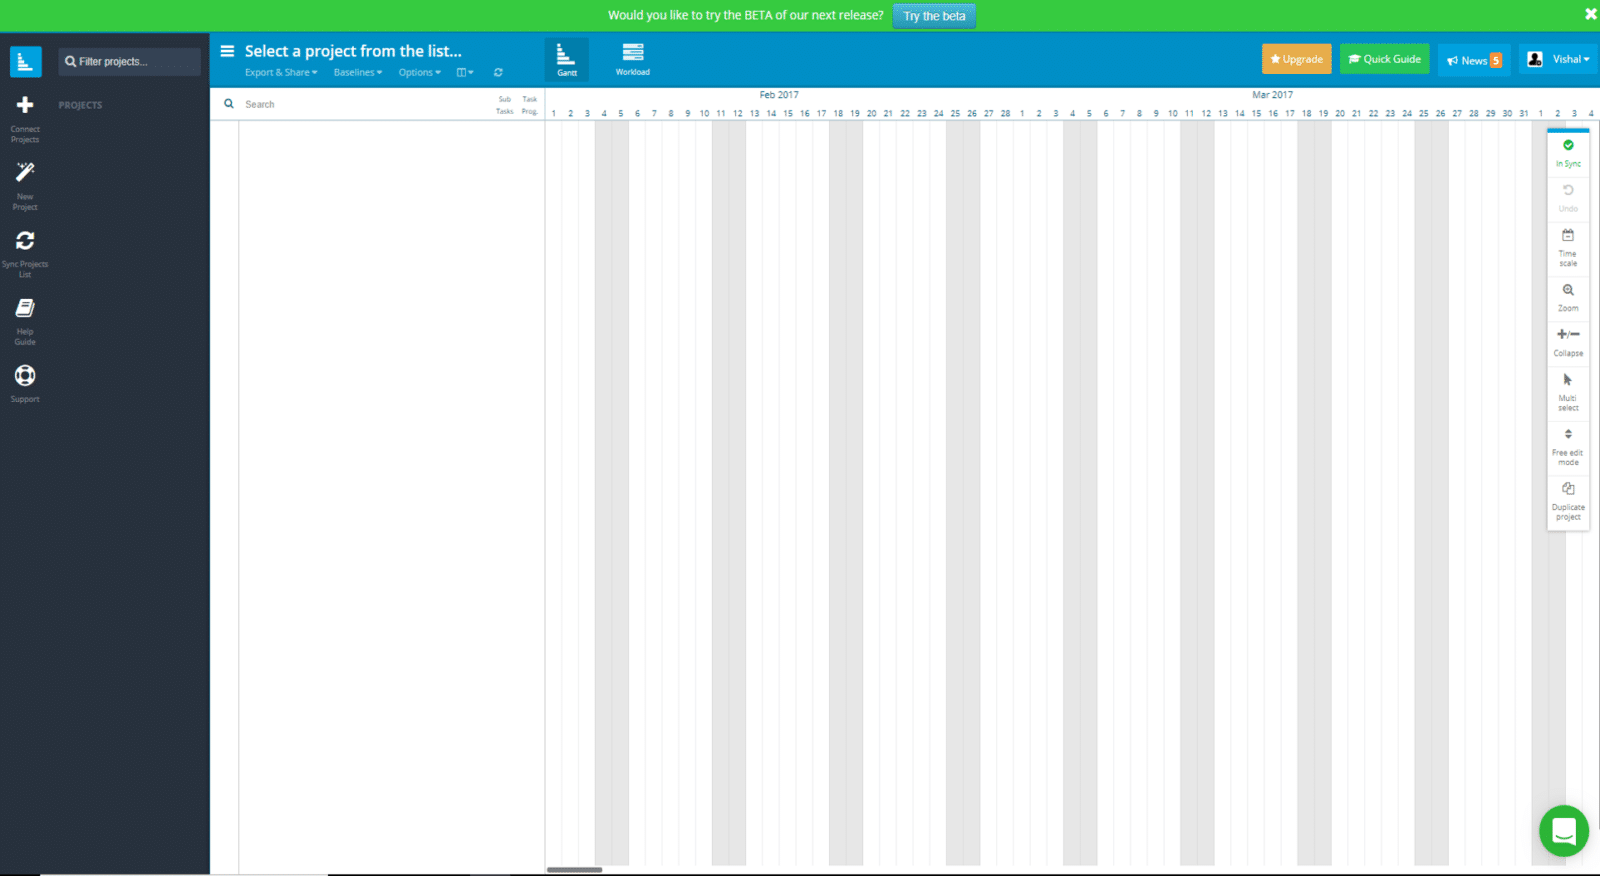
Unfortunately, Asana does not have built-in support for Gantt charts. But there are two options if you love Gantt chart.
One option is to upgrade to a premium plan and use the Project Timeline feature. It looks like a simplified Gantt chart.
To use Project Timeline in Asana, assign each task to a team member; Set Start and Due dates and arrange tasks in the correct chronological order. When you switch to the Calendar View, you will see the Project Timeline against the backdrop of the calendar.
While not exactly a Gantt Chart, the Project Timeline is a useful visual tool for managing your projects. But if you must have Gantt Chart, you can use Instagantt.
Instagantt is an Asana add-on tool you can use to create Gantt Charts for your projects. It uses two-way communication – changes you make in Asana show up in Instagantt and vice versa.
To use Instagantt, go to Instagantt website and click the Sign In with Asana button in the top right hand corner. Once you validate your Asana account, Instagantt will link to your Asana account.
You connect your Asana projects with Instagantt by clicking the Connect Project button in the left-hand navigation. You select the Asana project you want to connect with Instagantt. After you connect the project, you can see the project and its tasks in Instagantt in the form of a Gantt chart.
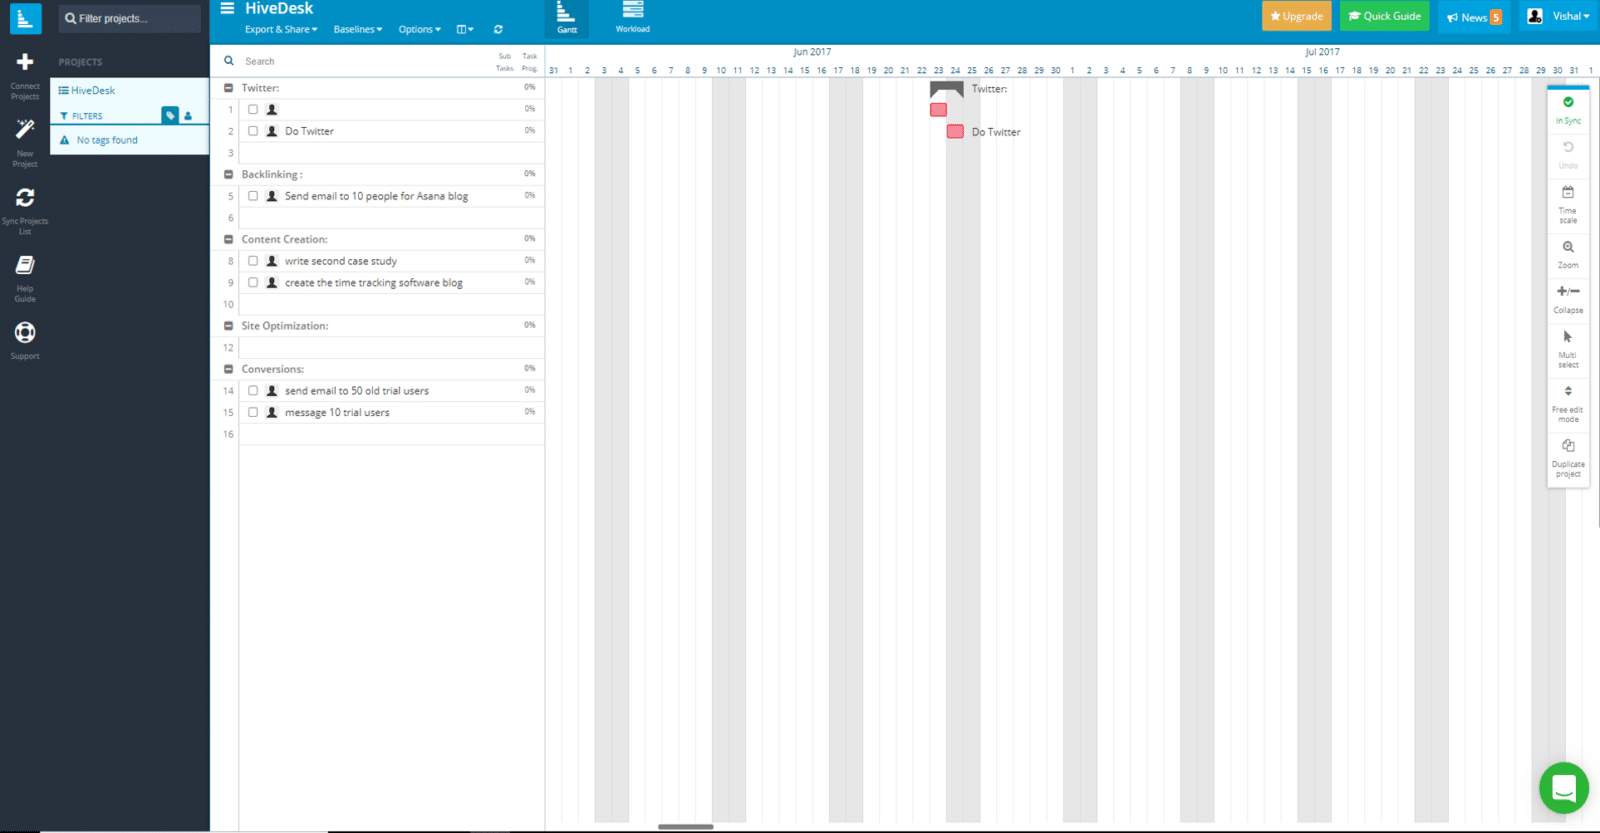
You can make changes to task schedule in Instagantt, re-arrange tasks, assign tasks to team members and mark tasks complete. You can also create subtasks within a task in Instagantt.
Using Instagantt to create your project schedule is easier because you can see the tasks, move them around and create dependencies. You don’t need a paid Instagantt plan to create dependencies between tasks. This is another feature available only in the paid version of Asana. This is a useful feature and a big reason many people use Instagantt.
You need not do anything to sync changes between Instagantt and Asana. It automatically updates all changes made in one place in the other. So if you add a new task in Asana it will show up in Instagantt. Similarly, if you update the due date of a task in Instagantt, it will reflect in Asana.
You can export your project from Instagantt into PDF or Excel formats. This makes it easy to share your projects with people who are not using Asana or don’t have access to your Organization or Workspace.
As you can see, Instagantt is a great tool for managing your Asana projects.

Communicating in Asana
Successful project management needs effective communication. Asana has several tools you can use to communicate with your team. We have already reviewed emails and Inbox alerts in the previous section. These are task level messages between people who follow a particular task.
You can start a conversation between project members by selecting Team Conversations in the left-hand navigation. This is a forum style, threaded communication channel. You can start a discussion that all team members can see. They can respond to your message, which will create the message thread. Team members can up-vote or down-vote individual messages.
This is a very handy tool for getting team members’ views on important project issues. It’s especially useful for a remote or distributed team where people can’t just jump into a room to discuss problems.
If you don’t like distraction and clutter caused by email notification, you will love the Asana Inbox. You can see everything happening in the project whenever you want by going to your Inbox.

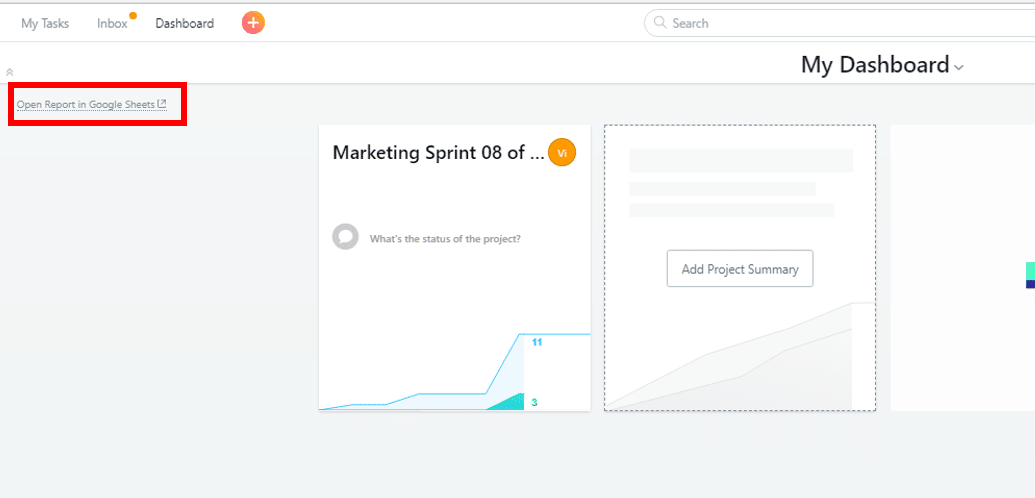
Project dashboard
Asana Dashboard is a great tool to monitor progress of your projects. The project dashboard displays important information about your projects in one place. It’s especially helpful if you are managing multiple projects in the same Workspace.
To create your dashboard, click the Dashboard link in the top left-hand menu. Asana will display a blank dashboard.
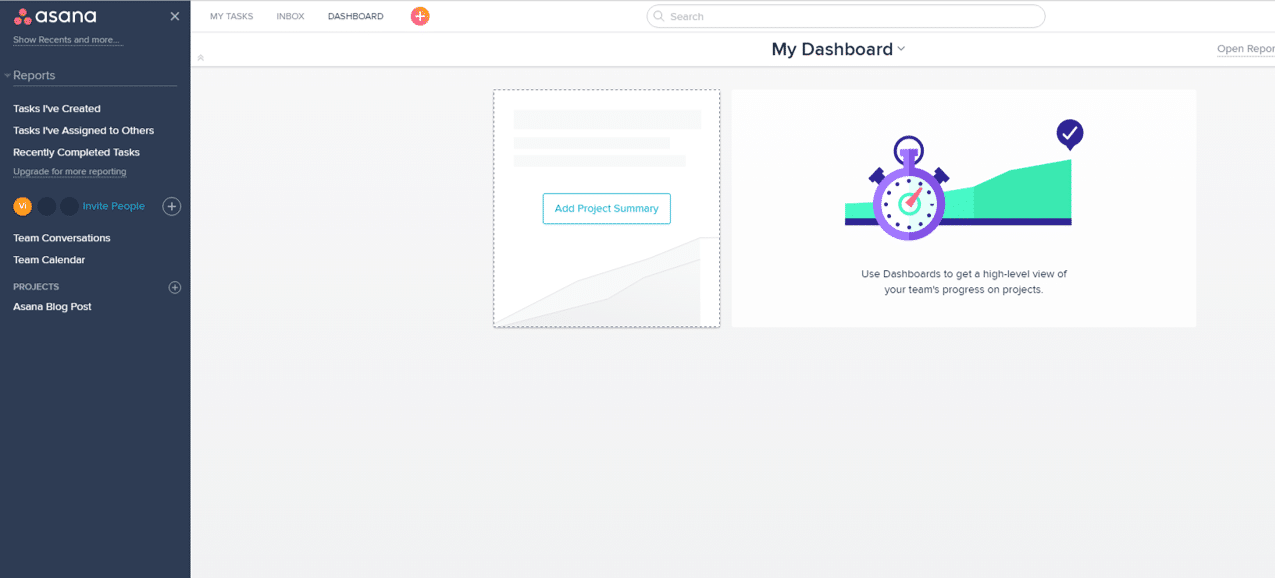
Click Add Project Summary to add a project to the dashboard. With the free plan, you can add only one project to your Dashboard. You will need to upgrade to a paid account to add multiple projects to your Dashboard.
When you add a project to the dashboard, Asana creates a Project Card in the dashboard. You can access project status by clicking the Project Card. When you add a project to Dashboard, Asana will send you a digest email every Monday with project’s status and its progress chart.
You can also link your dashboard to Google Sheets. Once linked, you will be able to see project’s data in Google Sheets and create custom reports & charts for reporting. Google Sheets integration with Asana Dashboard is extremely useful for creating and sharing project status reports with stakeholder who don’t use Asana.
Clink Open Report in Google Sheets on the top left hand side of your dashboard view to link the project to Google Sheets and export data.
This will take you to Google Sheets. You can see project data and charts automatically created from the project data. By default, the Google Sheets report has three tabs:
- Overview – It has instructions on how to use the Sheet and includes two sample charts created using your project’s data.
- Asana project data – This sheet displays important data from all of your Asana projects in your Dashboard. You can sort, filter or combine the columns to create custom reports.
- Live source data – This sheet is locked as it has live data about your projects. It is locked to protect it from accidental changes. You can use this data in other tabs to create custom reports. The best way to use data from this tab is to create a new tab and copy the columns to it. Then you can manipulate data in those tabs the way you want without breaking the link between Asana and Google Sheets.
Once you have your Asana project data in Google Sheets, you can create an endless number of reports and charts. You can create reports to answer questions like:
- Which projects are due in next 2 weeks?
- How many tasks in a given project are incomplete?
- Is any team member overloaded or under utilized in the project?
- Which projects or tasks are on track to be completed by due date?
You can use it to create reports for managers, executives and customers who may not have access to your Asana Workspace.
Ready to user Asana for your project? Go to asana.com and start managing your projects.